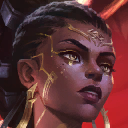
Mel Flex
Primary
Tier
Fast 9
1-Cost Reroll
2-Cost Reroll
3-Cost Reroll
Fast 8
Fast 9
1 & 2-Cost Reroll
1 & 3-Cost Reroll
2 & 3-Cost Reroll
 120
120
Main
▾
Traits

1
Targon
1

1
Chainbreaker
1
1
Dragonborn
1
1
Emperor
1
1
Rune Mage
1

3
Noxus
3 > 5 > 7 > 10
2
Arcanist
2 > 4 > 6
2
Defender
2 > 4 > 6
2
Disruptor
2 > 4
2
Juggernaut
2 > 4 > 6
2
Shurima
2 > 3 > 4 > 4
1
1
1
1
1
3
2
2
2
2
2
Tips & Tricks
- The core concept of Mel flex is to play Mel + Swain + Noxus unit + Disruptor + Defender + Sylas / Neeko + Shyvana + 2 slots. Those 2 remaining slots usually change depending on your 3rd Noxus unit. You can get 3 flex slots if you play Darius (both Noxus + Defender)
- For example, let’s say the 3rd Noxus unit is Sion. You can pair Sion with Kobuko + Zilean. Or possibly Volibear + Senna.
- Another example is if the 3rd Noxus unit is Draven, you can pair Draven with Kindred and then play any flex unit such as Senna. There are many options available, including keeping Ambessa on your board so you can play Fiddlesticks
- A common flex “no trait” slot is usually Senna, but any generically strong 5-cost, Taric, or Skarner can typically fit into that slot.
- In Patch 16.6, Sylas’s unlock condition was changed and made much easier. Therefore, always aim to unlock him in this line.
- Typically play from Noxus opener (Sion + LeBlanc) and ideally winstreak with econ so you do not have to roll heavily (or at all) on level 8. If you have to roll on 8, 5 Noxus boards with flex units like Kobuko are common.
- This comp can also get played from any Vi + Neeko AP opener into unlock Skarner + Nidalee on Level 7 and play around a board similar to the Ixtal Ryze variation on Level 8. Try and lock Neeko in the corner and use Nidalee as a Sylas item holder before you unlock him.
Strong Conditions
+3 Tier Conditions A → OP
+1 Tier Conditions A → S
Openers
Bruiser Invoker
 Briar
Briar Shen
Shen Sona
Sona Sion
Sion LeBlanc
 3
2
2

 Azir
Azir


 Shyvana

Disruptor
Noxus
Mel
 5
5
Level 8
Ambessa with an item dies in combat
Current
Alt Build 1
Alt Build 2
Alt Build 3
Economy Strategy
- Without econ augment, fast 9 is almost impossible without win-streak.
- Level to 4 if you have upgrades and a good item to place on one of those upgrades.
- Level to 5, unless on 3-loss streak.
- Level to 6 if on 4+ win streak (scout to see if necessary in high elo) or can stay above 40g.
- Level to 6, unless you would go below 30g. If you have to stay level 5 due to low gold (rare), then level to 6 on 3-5.
- Level to 7 if you can stay above 30g, otherwise stay level 6.
- Level to 7, or 8 if you can stay above 30g.
- Level to 8. Main difference from Fast 8 is how much you roll on 8. Ideally you are high HP and don’t need to roll at all. Otherwise, roll for acceptable board and accumulate gold afterward.
- Level to 9 if you are rich enough to roll 40g+. Generally only possible with economy augment or encounter.
- Level to 9 if you can roll 40g+ or if low HP.
- Level to 9 and roll for important 5-costs. For the remainder of game, roll until you hit your 2 star itemized units. Can consider level 10 after hitting.
arcanist emblem on mel with blue buff? mad potential for back to back casts
Annie is the most broken unit in the game
Dummify augment is OP tier for this comp.
Golemify augment is S tier for this comp.
Why do we lock Neeko in the corner with Ixtal Ryze version?
It’s for itemized Nidalee. Since you won’t have Neeko 3, the best way to keep Neeko alive is to trap her which keeps Nidalee untargetable. I forgot to put items on Nidalee for that variation, added them (she’s basically an item holder for Sylas — can transition from Ixtal Ryze board to Sylas-based boards after going Level 9).
I play this with that “Noxus Demacia Ryze” variant into “sylas galio ryze” variant, and it do well. Jarvan, Poppy, Garen, Swain, Ambessa, Renekton, Ryze, Mel, Azir. Unlocking Galio before Renekton or in the pve round, If Galio Unlocked -> Sell Garen for Sylas. After that if you found garen again in the shop, replace jarvan with it. Focus Itemize Ryze -> Tank -> Sylas. Never itemize Mel with mana item, because we dont really want the orb to “explode fast” and keep it spin longer to mana drain for printing radiant item, So mel will be Sylas Item holder before we got him.
If you get Noxus +1 I created some boards that you can follow since it can be hard to come up with how to fit 1 more Noxus unit on the fly. https://tftflow.com/team-builder/af9bae30 The first page means you can either play Shyvana or Fiddle depending on if you need Vanquisher for a 3-item Ambessa or not.
Recombobed into ambessa 2 on 3-2 and still went fourth, sure there’s gonna be skill issues there but god she’s underwhelming
i played this board. had 90gold lvl 9 80 hp with combat augments. i two started everything, therefore i had 6 2 star 5 costs, and 3 2 star 4 costs. went forth cuz mel couldnt kill anything. it is ridiculous how bad she is. final battle i lost to sion reroll… with 6 2 star legenderies
Seems like her best version now is in vertical Noxus with Kobuko and Azir
LeBlanc Zilean version gets wrapped from the right
I beat t-hex with this comp, only econ was epoch
Why x2 Adaptive instead of Shojin or BB?
because mel DRAINS mana from her enemies per orb. +30% of lets say 3 enemies * 2 orbs for 1 mana each is an addition +2 mana a sec or +8 mana drained in total.
Why would you want to play 3rd Noxus unit other than Ambessa since you already gotta have her 2 starred for Mel? Even traitless without Fiddle, she is much more useful than Sion/Draven/LB.
Have you read the Quickstriker / Bruiser / Invoker traits? All of them provide teamwide buffs that are FAR more valuable than a traitless, itemless Ambessa. A traitless, itemless Ambessa is legitimately a waste of gold. In an ideal world, you will play the Fiddle board because 1) Fiddle provides both CC and utility; and 2) It’s often easier to get to because you already have Ambessa. But there are games you will randomly hit a Kindred 2 on rolldown. There might be patches where Fiddle sucks and Zilean is a monster (definitely not this patch, but point holds) where you will want to prioritize the Zilean variations.
do you need to play 3 noxus in this comp at high cap?
I’d imagine not necessary super necessary, the trait doesn’t seem like it does that much late game but probably you’ll want those units for multiple reasons. Swain because he is insanely good, Mel because she is insanely good and you already have Ambessa 2 if you have Mel so often times may as well play her + she gives Vanquisher. I could see a world where you could cap harder replacing her with legendary 2 stars though.